Showing posts with label Introduction to Photography. Show all posts

Wednesday, 27 May 2015

Introduction to Photography - Week 14

27.05.2015 (Week 14)
Josephin (0320795)
Introduction to Photography
Theme based project : The Fascination of Wings

1. ISO 800, F8.0, S1/125

2. ISO 400, F8.0, S1/160

3. ISO 800, F8.0, S1/80

4. ISO 3200, F8.0, S1/100

5. ISO 800, F8.0, S1/320

6. ISO 400, F8.0, S1/200

7. ISO 800, F8.0, S1/125
Screenshot :
Feedback :
My picture was good but I have to manage about the background and object since the trees background quite disturbing. I should find an interest on something that I take not because it is the reason to get a great picture.

Reflection:
Experience : I realize that so hard to take animal picture especially bird because it will scare easily and fly away. Besides, I have to wait until I get the right pose of them and sometimes my exposure not correct then blur. Furthermore, should find a nice angle to make the picture seem interesting but this all taught me how to be more patience about something we can make perfection.

Observation : I observed that the more you take picture more improvement that you can gain to take a nice picture.

Findings : I found that almost of birds have a great colour on their wings. If I take picture in black and white mode. Particularly for those have red, black, white and yellow color it could give a strong contrast. Actually I'm not satisfied with my picture because some of it looks like normal picture.

Introduction to Photography - Week 13

15.5.2015 ( Week 13)
Josephin ( 0320795 )
Introduction to Photography
Studio Lighting Exercise

Lecture :
Today class Mr. Vinod explain about all kind of different lighting that we can use for take picture in studio. After that we matched the picture that we had found by the lighting and set it well.

Instruction :
Period picture.
Identify a period picture within the years of 1940 to early 1960s. Choose a picture that you are able to reenact or recreate. Prepare and plan your outfit, make-up and hair for the shoot. Try to achieve the same or similar result as your reference. Edit your picture in photoshop and update the picture to your Facebook profile. Document the process in your reflection on your e-portfolio blog.

Lighting Exercise

Imitating Picture :
My Picture :


Did makeup for everyone :

Reflection :

The studio lighting exercise for this week is quite interesting, but none the less complicated. We got to try out the soft boxes for a different effects of lighting. I was mainly stationed at the power back to control the intensity of the light. Unfortunately, I had tried many times to act the same way with the sample model but I was like ... my face look like shock not smile :))

Introduction to Photography - Week 12

8.5.2015 ( Week 12 ) 
Josephin ( 0320795 ) 
Introduction to Photography
Theme-based project - Week 3

Lecture:
Today we postpone our lighting so Mr.Vinod asked to bring our laptop for prepare the picture that we took around campus and edit then print out on A1 size paper.

Pictures for Theme-based Project: Texture of nature

1.


2.

3.

4.

5.

Screenshot :


Feedback :
I need a consistency in my series picture because all picture that I took was not really consistent.

Reflection: 
Experience:
Actually I didn't understand what size that we need to apply for the picture we had taken. I asked Mr. Vinod help to set out the size and explain it again to me. After we had done cropped and resized, we went to the print room at block D level 7 to print it out. However, my photo didn't had a good contrast between the black and white. After that I tried to arrange it again untill got the better picture. Thus, my coursemate and I decided to print them out on next Friday when we got class. 

Observation:
I observed that the tone of my picture printed out by a nice quality printer. The printer is totally different from that kind of printer that we usually use to print for document, it's special for big size paper. The outcome of the photo is satisfied and very detailed.

Findings:
In order to print the photo in A1 size paper, we should convert the picture into PDF file.


Sunday, 3 May 2015

Introduction to Photography - Week 10

24.4.2015 (Week 10)
Josephin (0320795)
Introduction to Photography
Assignment : Tioman Trip


            I'm Josephin a student from Foundation in Design January intake, I will share what I feel on this blog. We started our journey by bus to Mersing - Johor Bahru around 5 hours and took 2 hours by ferry to Tioman Island. Our trip group is based from August, January and March intake. After we reached there, I realize that Tioman Island so wonderful because I never expect it so beauty. Next, we chose our room key and took a rest till dinner. The next morning, we had breakfast together but honestly I couldn't ate the food since the taste was strange for me. The night was come, Mr. Charles explain to us about the mission we had to done there. Furthermore, we were done snorkeling together in the next day but some of us didn't go because they had their own reason. After dinner, I sat at the stairs near the beach and keep stared at the sky, I realized that nature was so beauty even in night. It remind me about my parents and home a lot. However, theres someone that could made my feeling better even only saw his face. *oops We chit chat and sharing a lot until midnight.

           On the last day, we were busy with our team to did the space dining area mission before sunset gone. After that we had a BBQ party and dinner together then we did born fire. We was wait for night by the reason of we want to end the last night with drink and happy together by dance and sung. I would not forget all memories that we mad in Tioman Island because its too lovely in my mind.

Wednesday, 22 April 2015

Introduction to Photography - Week 9

17.4.2015 (Week 9)
Josephin (0320795)
Introduction to Photography
Theme Based Project : Week 1

Lecture :
Today class were Mr. Vinod check our photos that we have printed out and he gave feedback about it. Then he showed us the previous intake works to be an inspiration later on. He also told us some of famous photographer and asked what will we take for the project.

Photos :
'Old Building and the shapes'

1.
  (F8 , S 1/2000 , ISO 3200 )

2.
( F8, S 1/3200 , ISO 3200 )

3.
( F8 , S 1/3200 , ISO 3200)

4.
( F8 , S 1/2000 , ISO 3200 )

5.
( F8, S 1/60 , ISO 100)

Screenshot :

Reflection :
Experience :
I feel so blank when Mr. Vinod asked me what is my topic for this project because my place that I lived. Last weekend I went to Kuala Lumpur for shopping with my roommates but I got ideas to take picture at Dataran Merdeka. I chose this place since I had went once when I were secondary school and the building got so nice structure. I tried my best to took from some angles to got good picture. However, I feel my picture not really nice because I had to rush before sunset and theres no sunlight.

Observation :
I observed that taking pictures around campus so bored because I feel like repeating it again and again. I still confuse how to use photoshop, it has so many tools that I haven't learn.

Findings :
I found that if we want to take a good picture must have something interest to attract people eyes. We cannot just take it randomly without considering first. Now I only understand how to make the picture look better by using levels. I can control the contrast between black and white as example the shadow is black.

Introduction to Photography - Week 8

3.4.2015 (Week 8)
Josephin (0320795)
Introduction to Photography
Exercise 5 : Editing and Printing (ungraded)

Lecture :
I was absent for today class because I got sick. So I learned how to edit the picture use photoshop from my classmates.

Instruction :
After capturing images around the campus select the best image in your estimation, edit and prepare the image file with white borders (as directed during the Editing exercise) and print an 8x10 print from Photomedia:


Printing @ Photomedia

Add: 44 (top floor), SS2/67, 47300 Petaling Jaya, Selangor D.E., Malaysia.
Tel: +603 7865 5227 Fax: +603 7875 5227

Picture that I obtained from last week class :

Picture I've chosen to edit using photoshop :

Feedback :
Via Facebook:
"Josephin, I didn't see any update for week 8: editing and consistency. Your exercise to edit and print the pictures etc?"

Learning goal: Students will be able to edit at a basic level and prepare and image in Adobe Photoshop for printing in a photography lab’.
Learning outcome 1: Students will be able to use exposure settings (Aperture, Shutter Speed & ISO).
Learning outcome 3: Students will be able to distinguish a bad exposure from a good exposure.
Learning outcome 2: Students will be able to use the Zone System exposure technique to achieve desired results.
Learning outcome 4: Students will be able to apply the Rule of Thirds and principles underpinning composition.
Learning outcome 5: Use Adobe Photoshop to edit pictures at a basic level.

Wednesday, 1 April 2015

Introduction to Photography - Week 7

20.3.2015 (Week 6)
Josephin (0320795)
Introduction to Photography
Exercise 4: Composition
Exercise 4.a: Rule of Thirds

Lecture :
We start our class with feedback and brief for new topic from Mr. Vinod. Then, he let us go for 2 hours to take some pictures around campus used all methods he had explained before. In the end of class he gave an exercise to do at home.

 1) ISO 1600, F 8.0, S 1/2000

 2) ISO 1600, F 8.0, S 1/3200

3) ISO 400, F 8.0, S 1/640

Instructions for Ex. 4b
Exercise 4b: Priciples underpinning composition.
Capture 4 Images adhering to any of the mentioned principles below:
Domination/Emphasis • Isolation • Balance • Repetition
Alignment • Contrast • Rhythm • Symmetry/Asymmetry
Harmony • Perspective
Print all 4 images on an A4 as instructed in class.
(Put to use what you have learnt in the Zone system exercises here)
4b) Principals underpinning composition (5%)
Marking Criteria: The image must show evidence of the dominant principle used and the supporting principles (if any) underpinning the composition. The principles underpinning the image must be named and should be visible within the image. Students must showcase their knowledge on exposure using the zone system.

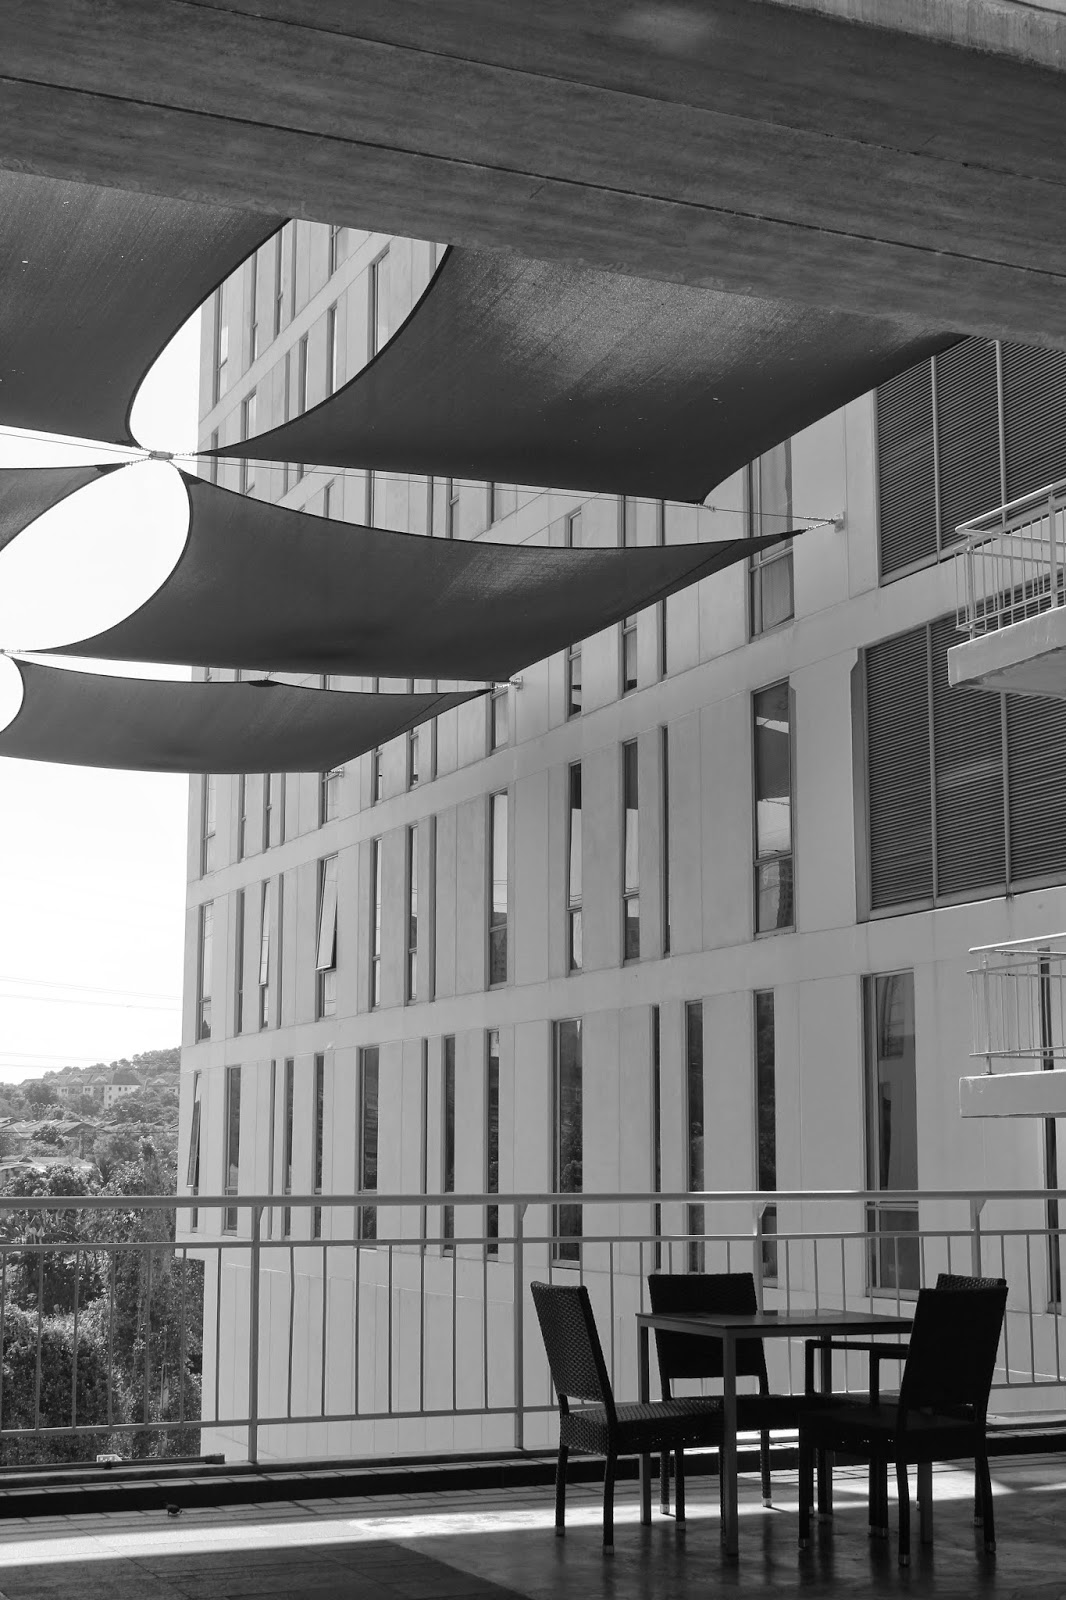
 1) ISO 100, F 8.0, S 1/160, Perspective

 2) ISO 100, F 8.0, S 1/200, Perspective

 3) ISO 6400, F 8.0, S 1/60, Asymmetry


Screenshot :


Feedback : Via Facebook
Josephin, you are suppose to use 4 different principles in your exercise, you have repeated the perspective principle twice. The work done however is inline with the expectation of the learning outcome but not inline with the instructions. When you put the work on your Hardcopy you have to separate the exercise from the Classwork (going out alone and taking pictures). You are also suppose to include the learning goal and outcomes along with the TGC in the post.

Reflection:
Experience:
I took the pictures 2 hours outdoor in campus around 10am during the photography class, I kept to change the shutter speed and shooted as much as possible till get the correct exposure then find the best one.

Observation:
I have not observe anything significant because I feel my pictures seems not good but I will try my best to do it again. Thus, I have to take more and get better pictures since the weather recently is not friendly neither support to take outdoor pictures. 

Findings:
I notice that its not easy to shoot an unique pictures for share because we need to observe good way and side view. Now I recognize shutter speed really useful for photography wherefore it control the light to camera. I realize that I gain more knowledge about camera world from this photography class.


Learning goal: Students will be able to use the above mentioned rules or principle to make or capture interesting, dynamic or subtle compositions. 

Learning outcome 1: Students will be able to use exposure settings (Aperture, Shutter Speed & ISO).
Learning outcome 3: Students will be able to distinguish a bad exposure from a good exposure.
Learning outcome 2: Students will be able to use the Zone System exposure technique to achieve desired results.
Learning outcome 4: Students will be able to apply the Rule of Thirds and principles underpinning composition.


TGC

Wednesday, 25 March 2015

Introduction to Photography - Week 6

20.3.2015 (Week 6)
Josephin (0320795)
Introduction to Photography
Exercise 4: Composition
Exercise 4.a: Rule of Thirds

Lecture :
Today's class started off with small quiz by twitter application on phone. Then he gave us 1 hour to discuss together what we know and don’t understand about the material that have been given. Besides, he started to explain about Composition and the Rules of Thirds. Before we were dismissed, we were given our assignment for the week.

Instructions:
Exercise 4a: Rule of Thirds
Capture 3 Images adhering to the Rule of Thirds
Using 1 person
Using 3 persons
Using a scenery
When placing the image on the document for printing; place one image with the Rule of Third lines visible and another without the lines side by side (as instructed in class)
(Put to use what you have learnt in the Zone system exercises here)
4a) Rule of Thirds (5%)
Marking Criteria: The student must show evidence of knowledge and ability to use the Rule of Two-Thirds under the prescribed circumstances. Evidence of composition enhanced by cropping is acceptable in order to heighten the dynamism or intensity of the picture. Students must showcase their knowledge on exposure using the zone system.


1 person (XueYi) : 

1) F6.3 ISO1600 S1/4000

3 Person :

 2) F7.1 ISO1600 S1/2500

3) F8.0 ISO1600 S1/2500

Scenery :
 4) F4.5 ISO100 S1/640

5) F7.1 ISO1600 S1/4000

Screenshot: 


Feedback :

Via Facebook :
"your findings, "I feel all my pictures that I took is not satisfied because some of it do not have aesthetic and only fulfill the exercise requirement." here was very crucial in your learning. You were right to conclude such and it is an important learning point. To concoct a scene can sometimes turn out a little fake or uninteresting or believable because it has feeling like it isnt real. This can take a toll on how interesting the picture is. With regards to the exercise; Your attempt at fulfilling the challenges that were set out to test you on your ability to apply the Rule of Thirds were successful by and large. However composition like all art (the art of seeing) requires practise, so I believe if you continue to exercise this newly acquired skill you will eventually develop a good eye in composition. Good attempt!"

Reflection:
Experience: This is an interesting lecture that I had done because its my first time and not easy as we seem. My difficulties of doing this exercise was that I had trying to capture a picture using the Rules of Third theory for a scenery. However, while I took 1 person is the easiest since I only have one subject to shoot and make it into a well position within my frame.

Observation:
I observed that photography have a lot of principles and y difficulties of doing this exercise was that I had trying to capture a picture using the Rules of Third theory for a scenery. However, while I took 1 person is the easiest since I only have one subject to shoot and make it into a well position within my frame.

Findings:
I found that a bit complicated when I asked my friend to pose for the picture it had to take at least more than 5 minutes to set up all the setting for compose the picture and adjust the exposure accordingly. I feel all my pictures that I took is not satisfied because some of it do not have aesthetic and only fulfill the exercise requirement.


Learning goal: Students will be able to use the above mentioned rules or principle to make or capture interesting, dynamic or subtle compositions. 
Learning outcome 1: Students will be able to use exposure settings (Aperture, Shutter Speed & ISO).
Learning outcome 3: Students will be able to distinguish a bad exposure from a good exposure.
Learning outcome 2: Students will be able to use the Zone System exposure technique to achieve desired results.
Learning outcome 4: Students will be able to apply the Rule of Thirds and principles underpinning composition.

Monday, 16 March 2015

Introduction to Photography - Week 5

13.3.15 (Week 5)
Josephin (0320795)
Introduction To photography
Exercise 3a: Zone System
Exercise 3b: The Ansel Adam's Shot

Lecture :
Today class started by discussion with friends about Zone System. Mr Vinod asked us to give questions that we didn't understand then he will answer it. This material is a bit harder than before because the setting complicated. He explained to us how to take pictures use zone system rules so detail and till we understand. After that he gave us time to prove it. In the end of class he asked some questions for us then gave us exercise to do at home and upload it to blog as e-portfolios.

Instruction :

Having learned that the camera light meter is dumb, because it gives you an average or optimized (middle grey; zone 5) exposure irrespective of the subject matter, execute the plan below to prove the theory and record you thoughts on the matter in your eportfolio.
Exercise 3a: Zone System
1. Capture three subjects: one light zones, middle zones and dark zones.
2. Take two images for each subject, one exposure according to the camera's light meter and the other according to the zone you believe the image falls under.
3. Ensure that the subjects you choose for each zone area (light, middle dark) have a good range of tones within the zone's area. As an example if you are capturing a subject that falls under the light zone and the subject is a white wall, it is only going to have 1 shade of the light zone, so avoid such subject matters, choose subjects that have a healthy tonal range within the white zone.
All pictures must be in black and white.
---
Exercise 3(b):
The Ansel Adam's Shot
Choose an image worthy of being called an Ansel Adam's shot (Still Life, Landscape or Portrait).
In using the Zone System sketch and write down the perceived zones in the desired image and indicate the ISO, Aperture and Shutter Speed used. Identify the point of interest and state the exposure settings recommended by the camera light meter and your improved settings upon using the zone system. The image captured must fulfill the following criteria:
3b) Ansel Adams Shot (5%)
Marking Criteria: Students must show evidence of using the Zone System. Student must produce 1 black & white image that captures depth and richness in tonal value by capturing light, middle and dark tones while maintaining details (texture and tone) in the dark and light areas of the image.

Exercise 3a: Zone System

Light Zone :

1. Zone 6, F4, ISO 200, 1/320


2. Zone 6, F4, ISO 200, S1/1000
Middle Zone :


3. Zone 5, F4.5, ISO 6400, S1/40
Dark Zone :


4. Zone 2-3, F4.5, ISO 6400, S1/60


5. Zone 2-3, F4.5, ISO 6400, S1/30

Exercise 3b: The Ansel Adam's Shot
P : F4.5 ISO3200 S1/125


Redo : 


Screenshot:

Feedback :
Via Facebook :
"you managed to showcase that the exposure meter isn't accurate all the time through exercise 3am. However my instruction were that you need to fill the frame of your view finder "only" with zones that fall within; the light zones, middle zones and dark zones, but you dark zone shot in exercise 3a didn't follow that. Nevertheless, you still managed to prove that the exposure meter is dumb. Your middle zone picture had only one option, I assume that you feel the exposure meter in this instance was accurate. I would like to tell you that you need to take pictures in day light and not indoors! The lighting quality in doors are insufficient and effects quality of the image as can be seen in your exercise 3b. Please redo it and see me for further explanation in the morning. The choice of subject matter for exercise 3b needs to be a lot more aesthetically pleasing or interesting. Your choice of subject was a little dull due to the lack of a strong point of interest, the subject matter isn't visually arresting. You must go out side your room or dormitory. Now with regards to your reflection; please read the definition before writing the reflection; experience, observation and findings. You can keep your sentences brief due to the challenge of the language but you must reflect on your result by explaining what you observed and what you found out."

Reflection :
Experience :
Today class was caught my attention fully since I learned a new topic called "Zone System". As usual when I read the material before class start, it's make me feel really confuse. In the class, even that Mr Vinod explained twice actually I still cannot understand because we have to remember the zone then decide which is dark, grey or dark zone. But after the final explanation I can understand a bit like dark zone is zone 3 as example road then bright zone is zone 7 as sky or snow and every picture that you take is zone 5. Let's assume that if you take picture of sky zone 7, you have to change the shutter by two stop of aperture. Therefore, 1 stop of aperture mean change 1 zone.

Observation :
When I took pictures at campus for the 3a exercise, Mr Vinod take a look of what I had took and he said that I have to take something look more 3 Dimension and look for my friend's work so I took again at home. When I took exercise 3b I feel confuse when decide which zone is middle or dark zone because sometimes it look same. 

Findings :
I notice that zone system is optimum capture of the real object and colour that we have seen wherefore in this material the exposure meter is not correct. In the manner of doing this exercise frequently will improve your understand and skill of zone system.


Learning goal: Students will be able to use the Zone System to capture an accurate and desired exposure of a real-life scene with a wide range of tonal values. 
Learning outcome 1: Students will be able to use exposure settings (Aperture, Shutter Speed & ISO).
Learning outcome 3: Students will be able to distinguish a bad exposure from a good exposure.

Learning outcome 2: Students will be able to use the Zone System exposure technique to achieve desired results.